Tuesday, September 3, 2013

Easy Mike Wazowski (Monsters, Inc.) Nail Art

My daughter LOVES Monsters, Inc. and Monsters University.  She also enjoys fun nail polish art.  Being that I am not any sort of amazing artist, I'm always trying to think of fun designs that are easy enough for me to pull off.  This one is my favorite so far!

Whenever I set out to paint Alaura's nails, I always set her up at her table with a good movie to keep her interested long enough to sit still and not destroy her nails.  The actual painting part will take 20 minutes tops.

First, you need the right colors.  These were the closest color matches I could find: For the overall monster color, I used Wet N Wild Fergie "A008 Glowstick." For the black and white parts of the eye, I used Revlon Nail Art Expressionist "310 Night & Degas" - or more simply, black & white.  For the eye color, I used Revlon Top Speed "340 Ocean."


First, apply two coats of the Glowstick color.  I just love those little hands!!!


Then gently apply a white circle.  Try not to let too much nail polish on the nail during this step and the remainder steps - it will take forever to dry.

 
After allowing the nail polish to dry slightly, move on to the next step, using the "ocean" color for the irises.  A simple dab of the brush on the nail should do it.  Be careful not to have too much polish on the brush or you will end up having to wipe a nail clean like I did.

 
Once again, letting it dry slightly, move on to the next step.  Add a black dot at the center of each iris.


For a nice finishing touch, make a tiny white dot to give the appearance of light reflecting.


Add a clear top coat to keep it from chipping too quickly (although on a toddler's hand that's hard to avoid).

Leave plenty of time for the nails to dry.

Voila!

Saturday, April 27, 2013

Toddler Friendly Mother's Day Project - Flower Pots - good as a gift for any occassion


This is an easy project for your toddler to do that makes a great personalized gift for friends and family.  The nice thing about it is that it is actually useful!

We had a lot of fun with this, from picking out the supplies in the store to putting it together.  Michael's is her favorite store now.  Supplies: clay pots and dishes, acrylic paint, paint brushes, pens, floral tape, fake flowers, foam, easter grass, tape.  (Extra supplies: smock, plastic bag, water cup, paint palette).


I tied her hair back, threw on a smock, put a plastic bag down to cover the table, and let her go to town.  She very carefully picked out her paint colors.  With a fine brush, I painted "Alaura loves ..." and instructed her to not paint on the letters, which she mostly obliged to. 


We made seven of these pots, so the painting process happened over several days due to her short toddler attention span.  But it was a nice activity for us to do, so neither of us minded that it took a while.  We love doing crafts together and are always looking for fun projects to do.  At night, while she was sleeping, I did the pens.  I cut some fake flowers off the bunch, used floral tape, and wrapped them onto the pens. I used double sided tape to secure it at the end.


I cut the foam, she pushed it in the pot (with my help).  It was all about having her be a part of most of the processes so that she really felt like this was HER project.  I thought that was important since they were her gifts she was making.  Besides, we are fully in the "I do it myself" phase.


She put the flower pens in the foam.  This was almost as fun for her as the painting process.


I didn't like the foam being visible like that so...


We added paper Easter grass!

Wednesday, March 27, 2013

Easter Bunny project

It's Spring break.  Our winter break was cancelled due to hurricane Sandy, so it's a huge relief to have some time off.  I have been itching to have some quality one on one time with my daughter.  We scheduled a few play dates for this week, but we had to cancel all of them because I got a bad head cold, and I don't want everyone else getting sick.  The benefit from this, of course, is our time home together. 

With Easter coming up this weekend, I thought it would be nice for my daughter to make a little something to give to the relatives.  This project is perfect for a toddler (with some help from an adult), and kids a little older too :) 


Since my daughter is a toddler, there is definitely some prep time involved.  It took me about half an hour of prep before I was ready for her to help put it together.  First, the supplies.  We took a trip to Michael's for this project.  We got some white foam sheets, pink felt, multi-colored googly eyes, and pink sparkly pom poms.  We already had the pipe cleaners, glue and paint pen.


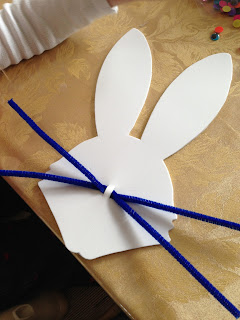
Not pictured here is the card stock I used to make a stencil of the bunny and the felt ear coverings.  This was the hardest part, and it really wasn't that hard.  I picked a circular object from my kitchen to start sketching the head.  I free handed the rest, and ended up drawing half the head, then folding the paper in half to cut out the stencil.  Below is my stencil next to a foam sheet.

 
So I traced the bunny head onto the foam sheets and cut them out...

 
Using some more card stock, I traced the bunny ear, then free hand drew the oval inside it so that it was the right size, and cut that out.  I used that stencil to cut out the pink felt for the ears.


Using a razor blade, I put two slits where the nose would be.  After this, my daughter could participate.  She had fun assigning different colored wiskers and eyes to each bunny.  I put the pipe cleaner in the slits, and she pulled them through.  If I were going to do anything differently, I would add a third pipe cleaner, as my husband jokingly commented "you know, rabbits have more than two wiskers."


Put a little glue right in the center and a pink pom pom for the nose.  Some more glue, and the eyes are attached.


Glue the pink felt on the ears...


Use the paint pen to draw on that cute little bunny smile. 

 
Perfect gift for your child to give out on Easter.  Of course, mine had to keep one for herself ;)

Greetings from Petite Princesses!

Hello!  My name is Stephanie.  I am a full time working mommy.  My beautiful petite princess continually inspires me to create.  I currently specialize in tutus, head pieces, and accessory holders.

I hope to use this blog to post our craft projects that we do together, and some of our mommy/daughter adventures.

I'm not sure how often I will be able to post here since I do work full time, but I'll share what I can.

In addition to crafting, I am a choral director, private vocal teacher, and NYSSMA adjudicator.

...Okay, enough about me.  I'm looking forward to conversing with all of you :)